Introduction
A couple of years ago, I started researching approaches to emulating film stocks entirely from manufacturers data sheets. Apart from Ravengrade’s Kharma PFE LUTs, the widely available film emulation solutions back then still relied on camera specific profiling. My background is in corporate, and I definitely don’t work in Baselight. So I also completely missed what the people at FilmLight were already doing. Shame on me for not watching Tribes of Europa, by the way.
In August 2025, I stumbled on this completely by accident, when I was exasperated once more with the colour management of stills from an old Canon EOS 5D Mark III in DaVinci Resolve. Also in August 2025, the Genesis OFX plugin for Resolve was released and, since they allegedly did something similar, the topic of so-called “spectral film simulation” gained traction fast. I would still call this emulation, though I’m not willing to die on that hill in case anyone wants to argue.
Anyway, while the market for film emulation and video plugins overall improved tremendously over the years, it also became quite saturated. I wanted to stick to a LUT-based pipeline that could utilise DaVinci Resolve’s FPE LUTs and wasn’t bound to built-in texture adjustments. I wanted full modularity and behaviour that would come convincingly close to real Cineon scans.
So, the concept was to somehow turn the sensitometric, densitometric and spectral data from the spec sheets into a 3D LUT that would emulate the characteristics of a given film stock. For the sensitometric curves, this would be easy: put the values of the digitised graph into a spreadsheet editor, optionally normalise, export them with a 1D LUT header. Done!
The spectral sensitivity curves are a bit trickier, though. Actual maths would be needed to get it right, the terrifying kind, namely integral calculus. I don’t know where you were when analysis was taught at school, but I was mostly drunk or stoned.
The workflow would need to be applicable to someone who’s not necessarily willing or capable of refining and applying more or less complex mathematical operations and putting them into code. That might be me. With a look at the still-photography world, there are solutions like RawtoACES and DcamProf that already use spectral integration to match the sensor responses of digital cameras to a standard observer. In their case, this is used either to convert RAW stills into ACES or to generate ICC profiles for a photographic workflow. By its nature, this is already generating LUT-based input transforms as an alternative to matrices.
So, what are we going to do?
As mentioned above, I stumbled upon this while working on a way to create my own LUT-based transforms for the 5D that would finally satisfy my needs, since CineLog-C is no longer available. As RawtoACES only converts image files directly, DcamProf lets you create input transforms as DCP or ICC profiles, with a vast variety of options. One of them is an unbaked XYZ CLUT combined with a forward matrix. You may see where this is going.
If we extract the CLUT before the final profile is built, or even just rip it out of the final ICC profile, we are left with an unmapped and unbaked 3D LUT whose output we can now remap freely.
Consequently, any given profile created with such an approach should be sufficiently invertible. Now translate that logic to film: the spectral sensitivities of film stocks are usually published. So you could just pretend your spec sheet data is camera sensor data and therefore build an input profile for a film, which might be usable with real film scans, depending on how much the scanner’s interpretation of that film differs from the ideal representation in the spec sheet.
It’s simple: we get an input transform from the negative to a working colour space. We invert it and – BOOM – film colours! At least in theory. Also in practice, as we’ll see later. Building an output profile from DWG/Intermediate to Cineon can be broken down into three steps overall.
Step 1: Gathering and formatting the data
As mentioned above, the goal is to create an output LUT that goes from DWG/Intermediate to Cineon by treating the spectral sensitivity curves of the given emulsion like spectral sensor data from a digital camera. For that purpose, two groups of curves are needed: the spectral sensitivity curves and the sensitometric curves. The workflow differs a little depending on the film type (negative, reversal or print) and intent. In this example, Vision3 5219 500T negative film is profiled. For example, by converting the log densities to transmission, it is possible to obtain a negative emulation that can be used with regular negative-inversion tools, which is a very convenient way to create your final tone curve for the profile.
However, here the log values are fitted into Cineon directly from the chart, which is well described on demystify-color. Just a simple gain operation is added.
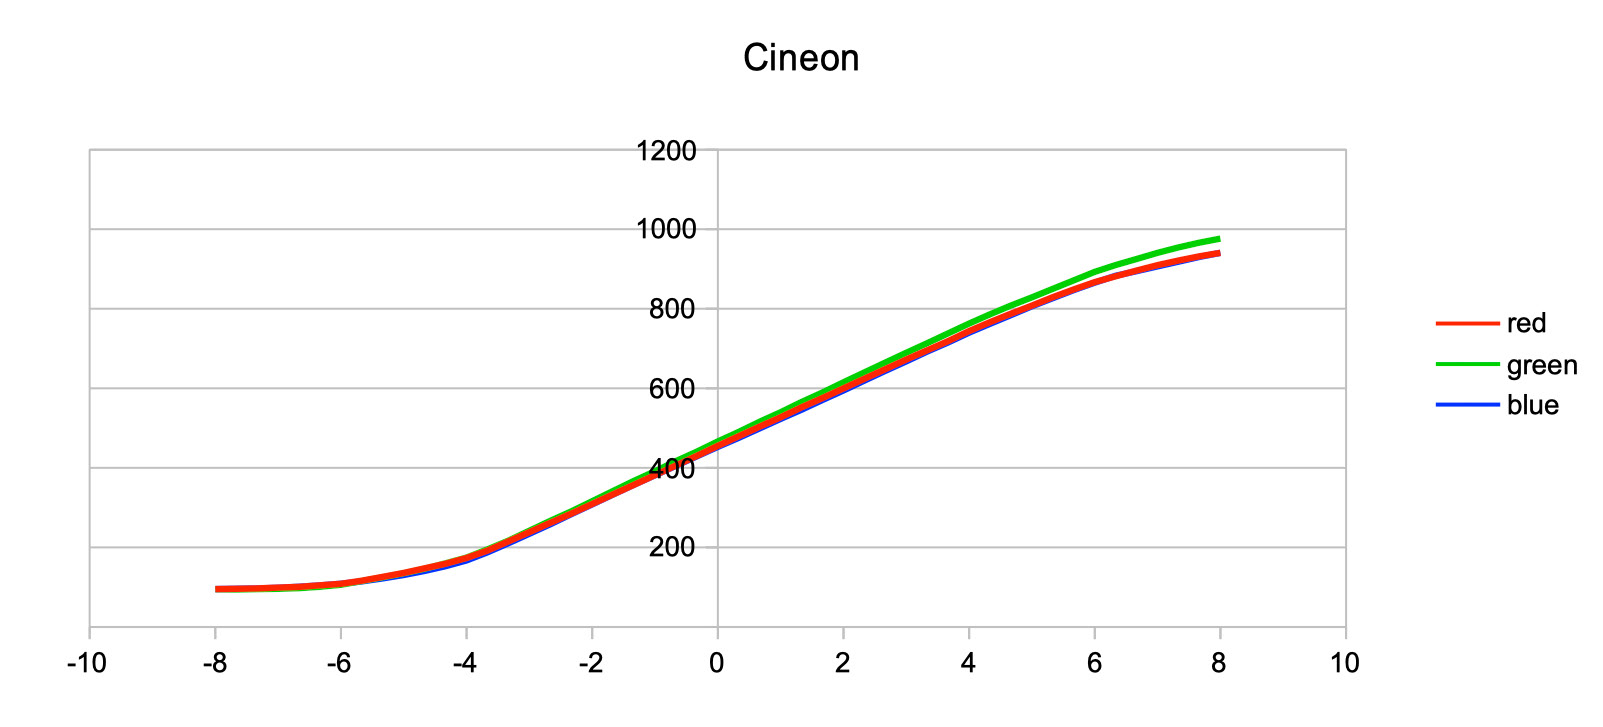
The densities from the chart aligned into Cineon space, balanced with a gain operation
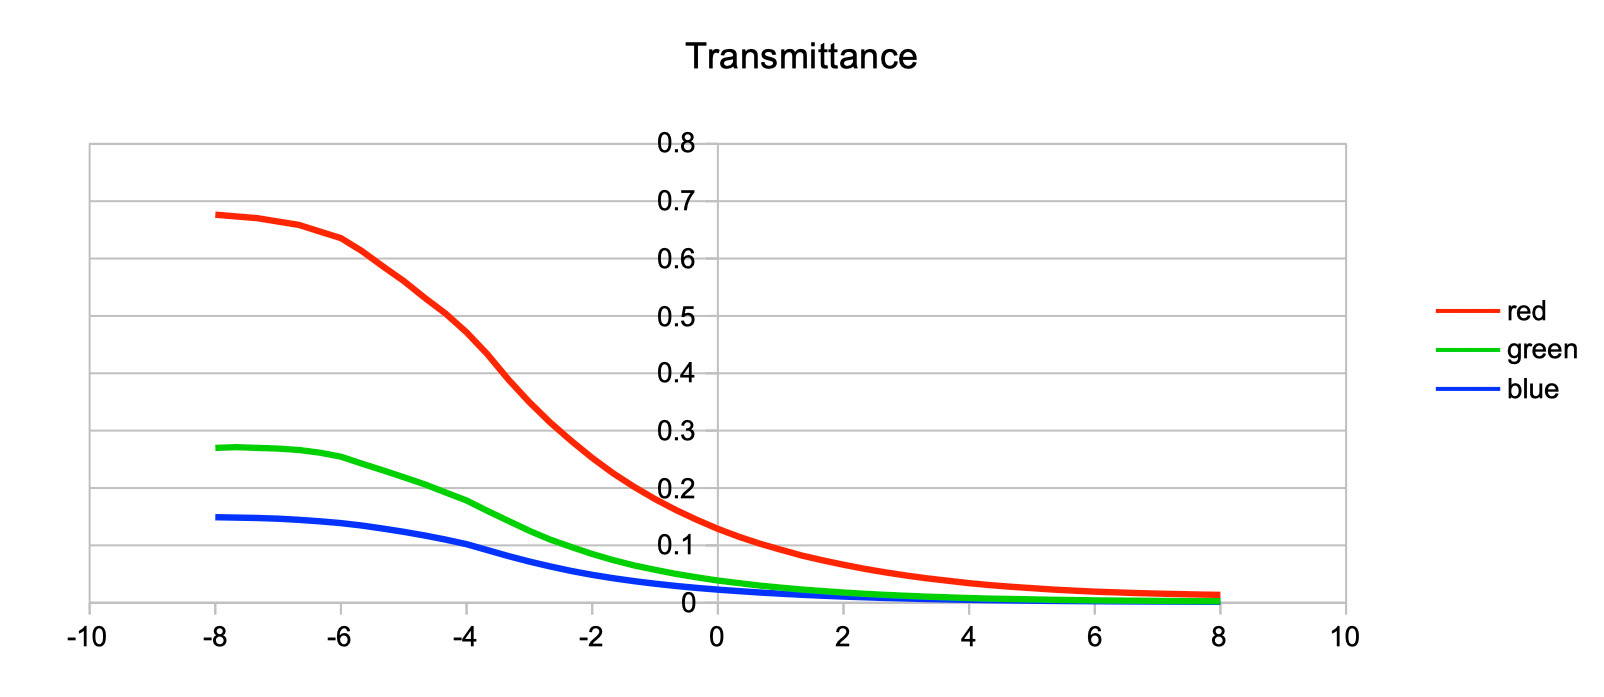
Alternative: conversion from density to transmittance, for the emulation of a developed negative
The spectral sensitivity data in film spec sheets is logarithmic. We will treat it like spectral response data from a digital camera. Technically, that means the values should be normalised and converted into a linear scale. DcamProf can integrate them either way, but the results may differ depending on your choice.
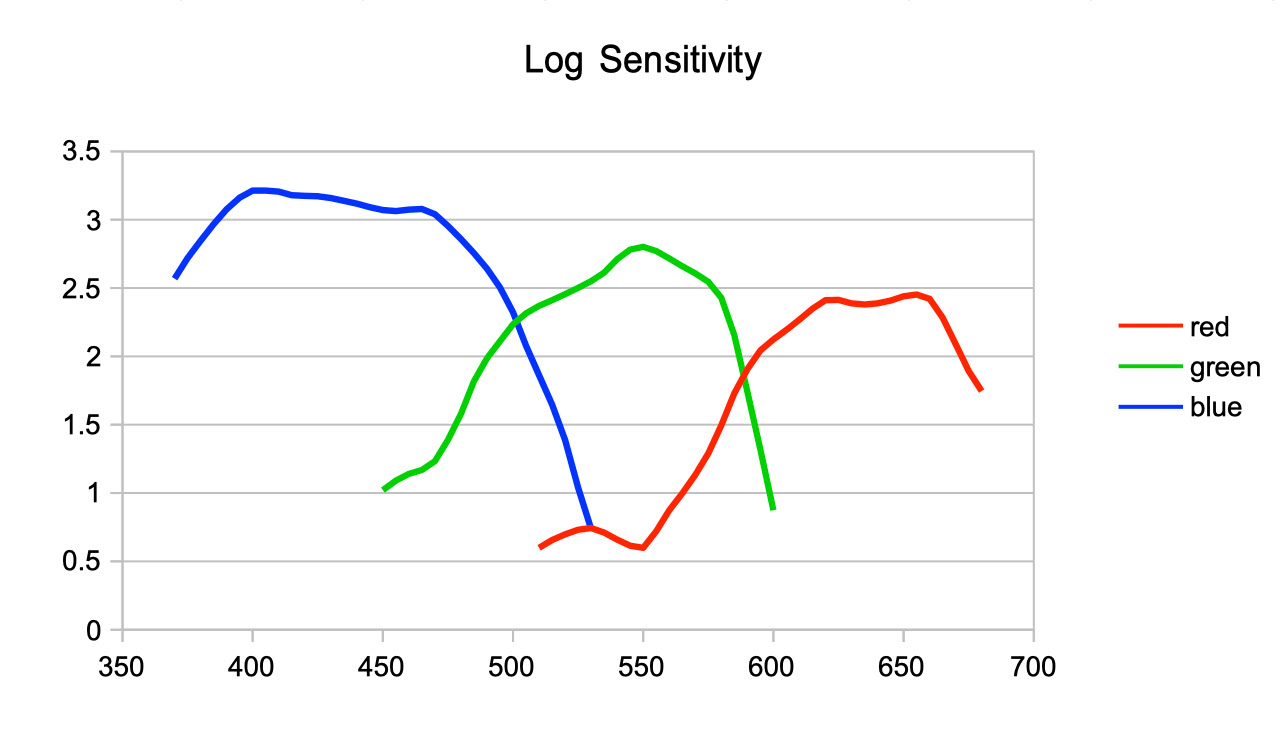
The spectral sensitivities of Vision3 5219 500T in log scale
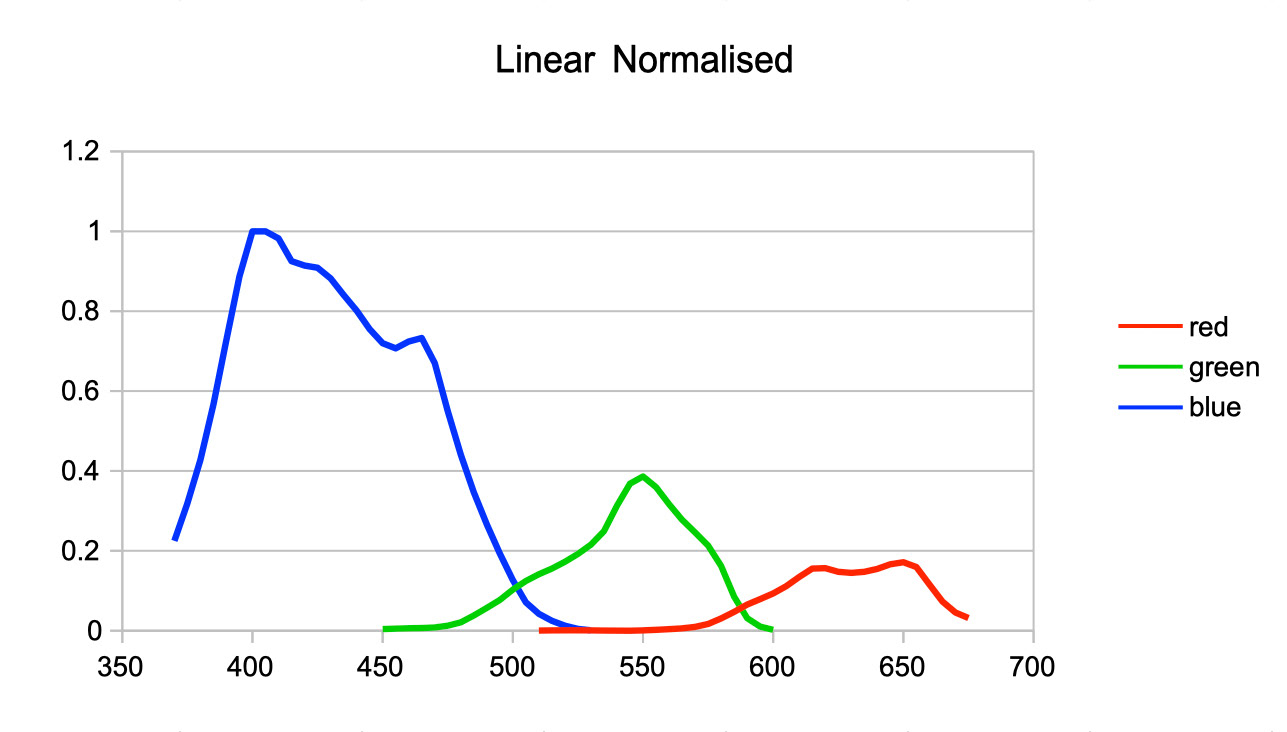
The same sensitivities converted to linear (0–1), for our “film emulsion as a sensor” approach
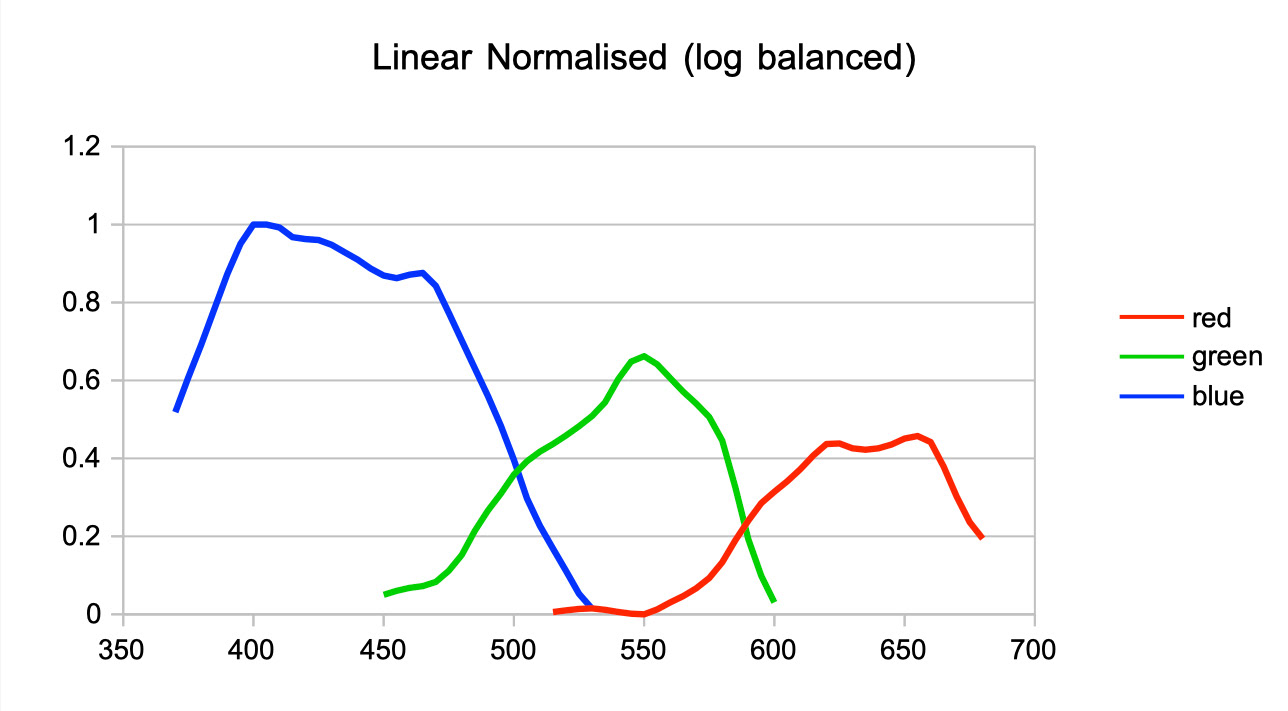
Different orders of operation lead to differently linearised spectra
Step 2: Making the profile
As mentioned, the 1D LUT can simply be exported as a CSV from any spreadsheet editor. Though a conversion from your preferred log space to Cineon has to be put upstream. If the formula of the source encoding is publicly available, this can of course be done directly in the spreadsheet.
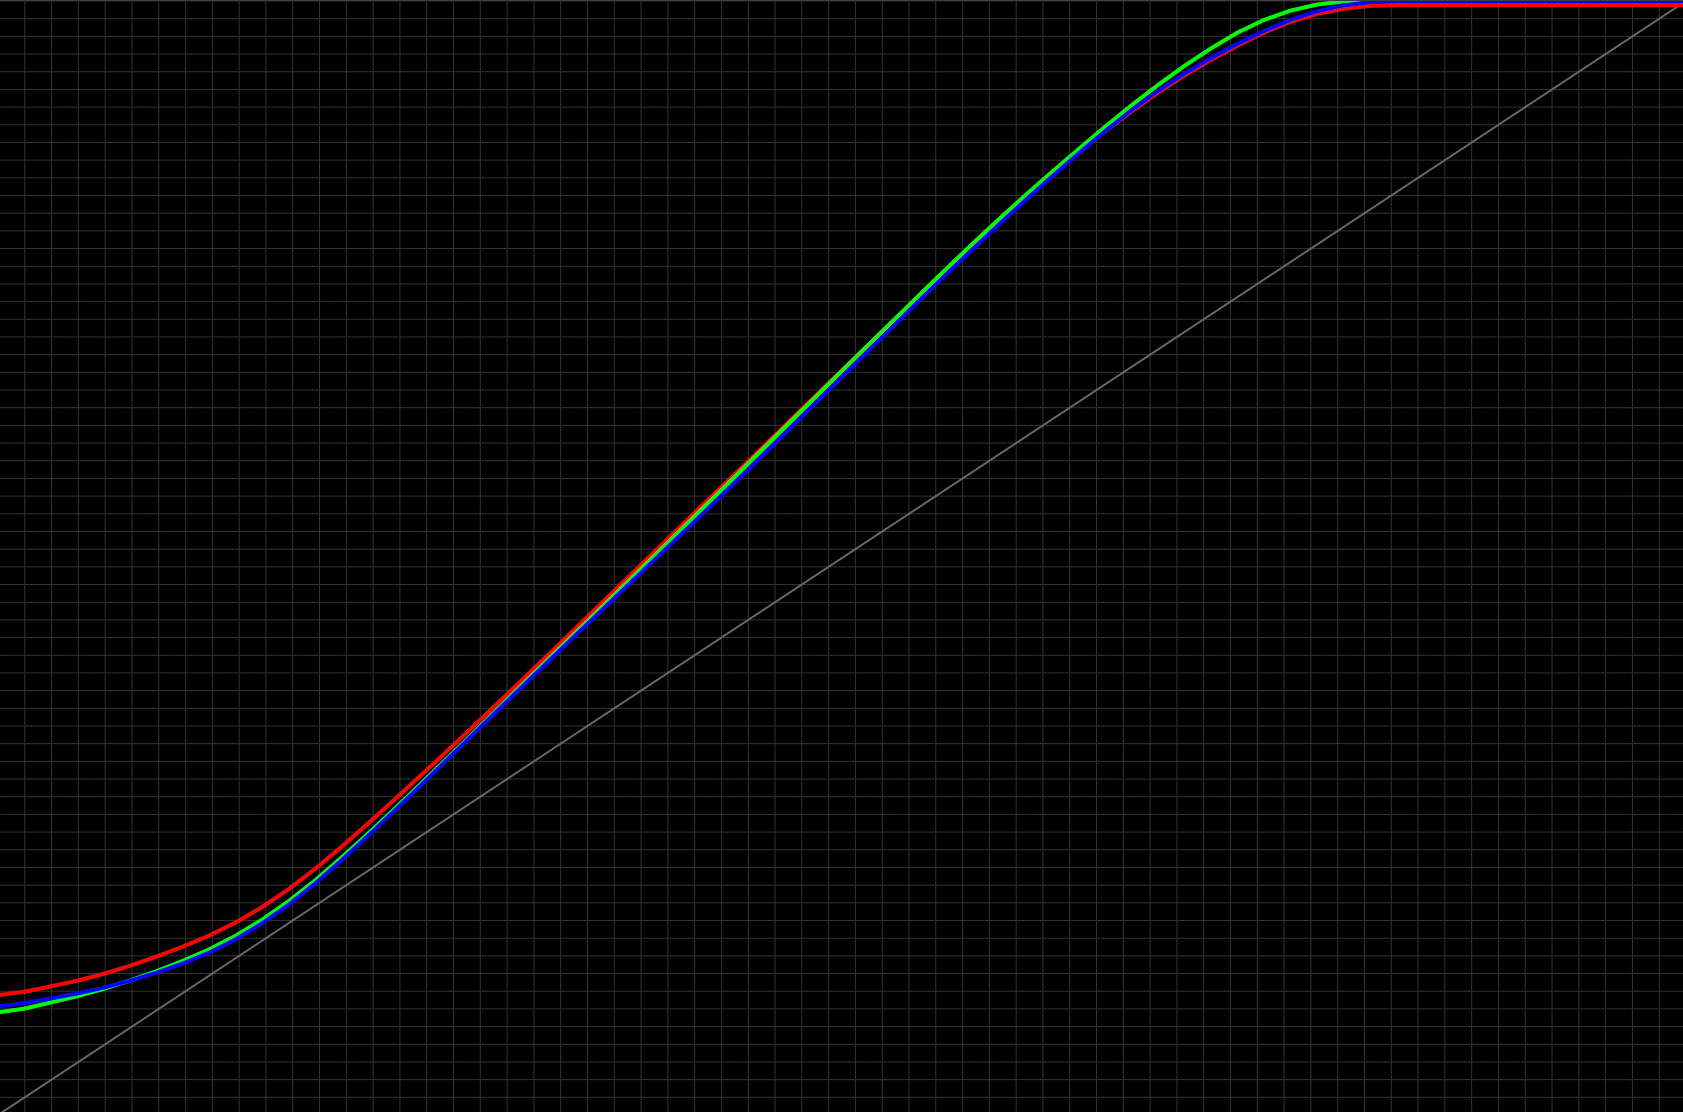
Screenshot from Lattice: With the transform placed upstream and a bit of balancing, the final tone curve falls into place
As mentioned, the spectral sensitivities of the film will be integrated and matched to a standard observer. For an output transform from DWG/Intermediate (or any other working colour space) to Cineon, we can utilise DcamProf as a foundation to create an invertible profile.
This process gives us an input ICC profile for our film as a sensor. Because of the ICC profile structure, we can easily rip out the LUT part and strip away the fixed profile logic around it by simply opening the final ICC profile in Lattice. We are now left with an unmapped input profile from the film’s response to XYZ. The output is then set to the preferred working space, and the profile is inverted.
The order of CLUTs from ICC profiles can be wonky and needs to be ironed out so as not to be misinterpreted by apps like Fusion. Also applied is a first pass of shaping, fitting and smoothing to make sure everything stays in bounds without clamping values. The re-export will also “sanitise” the LUT order.
From the unmapped XYZ profile, the primaries are set before inversion. The end result is the shaped transform from DWG to 5219
Step 3: Combining and finishing
After combining the sanitised 3D LUT with the balanced 1D LUT from the sheet, a second shaping pass is done. Gamut compression is applied, curves are adjusted to imitate a scanner output. The final profile now resembles a Cineon scan whose output fits into any FPE LUT.
The final 5219 profile in Cineon and with 2383 FPE LUT
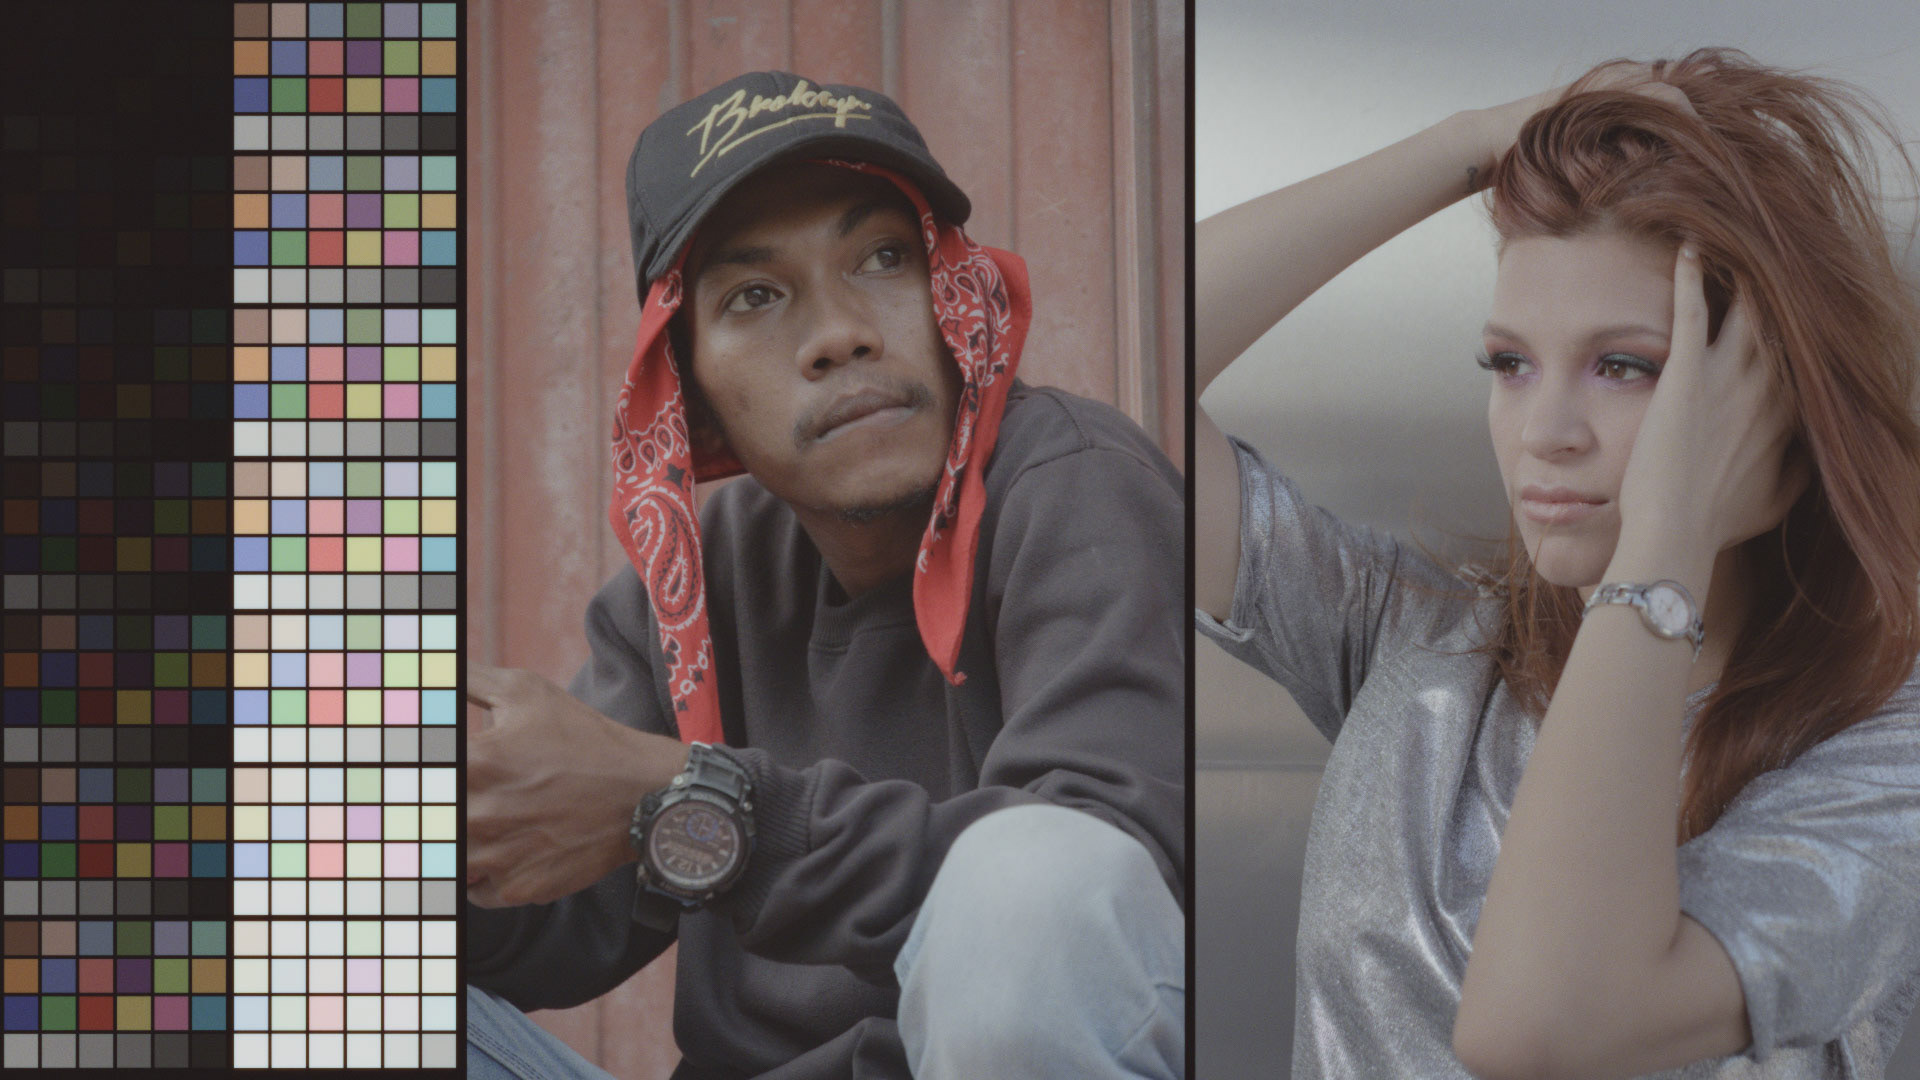

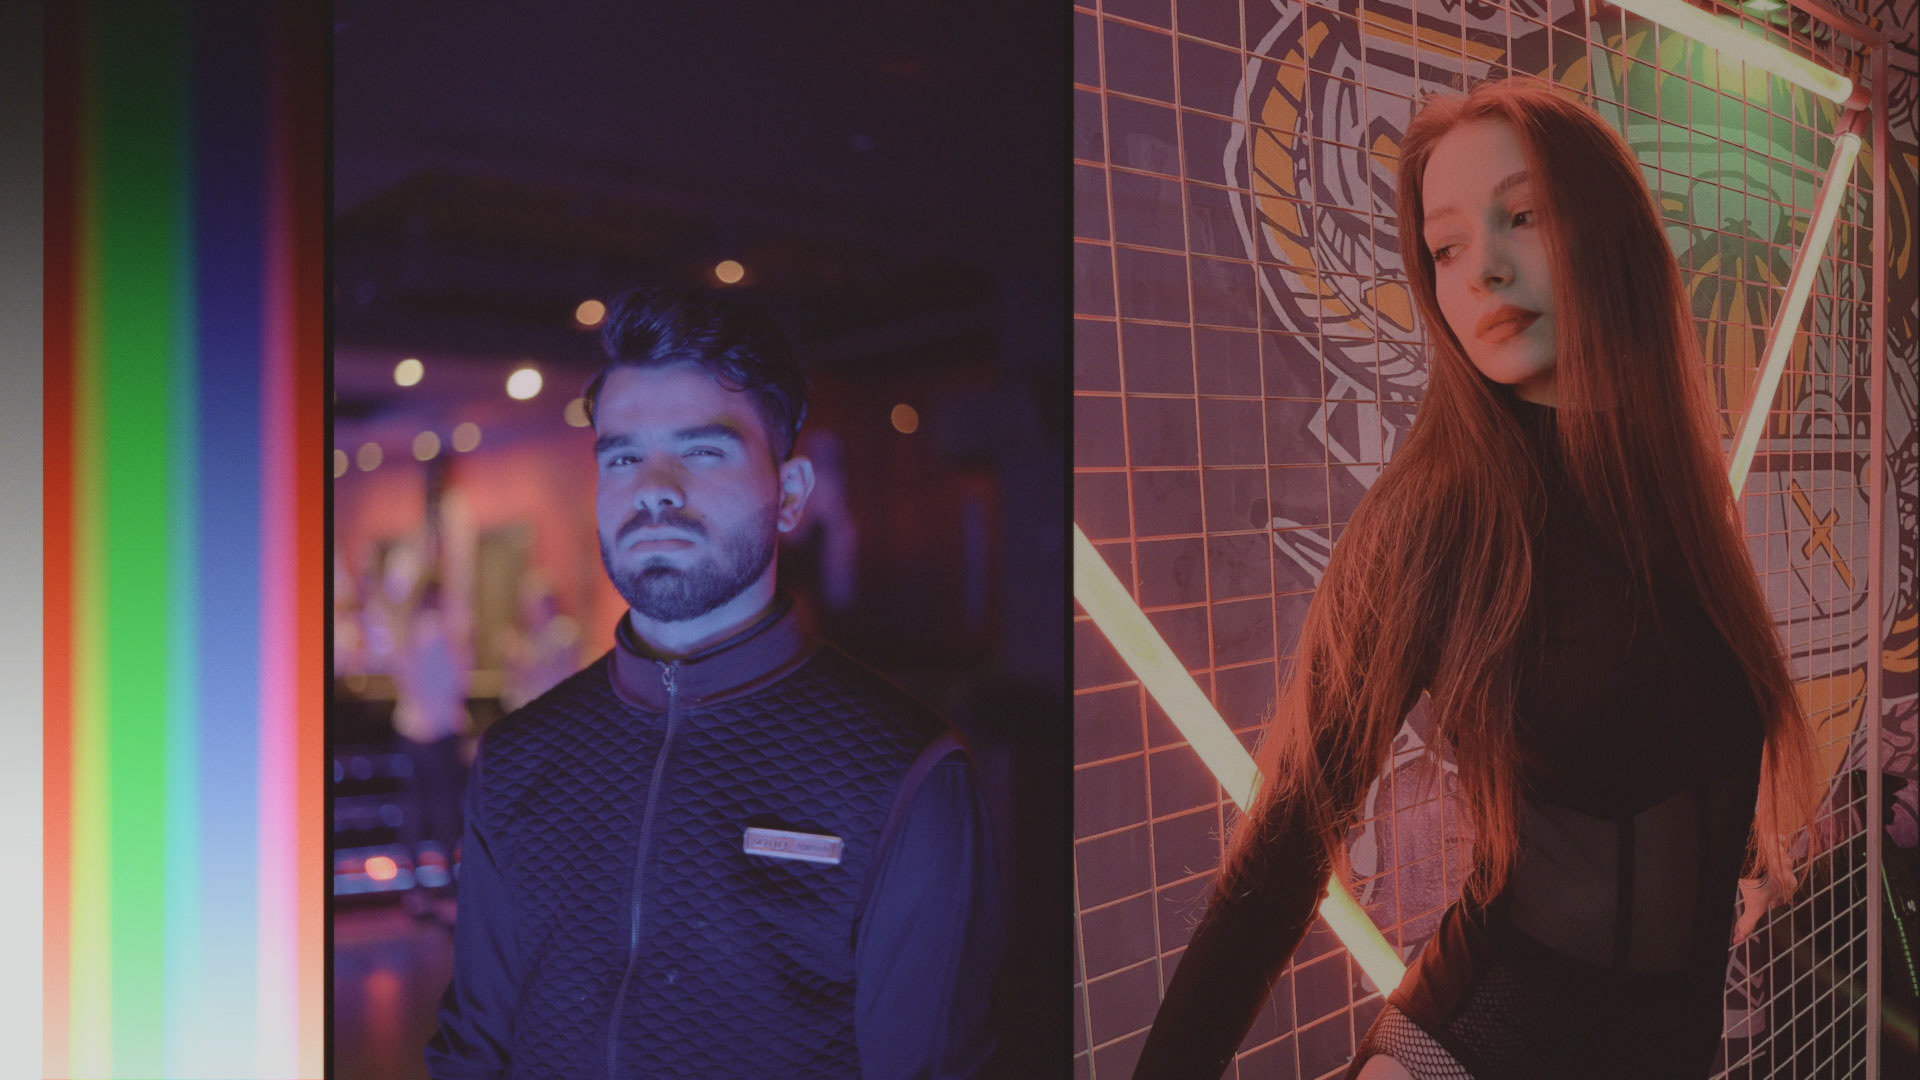
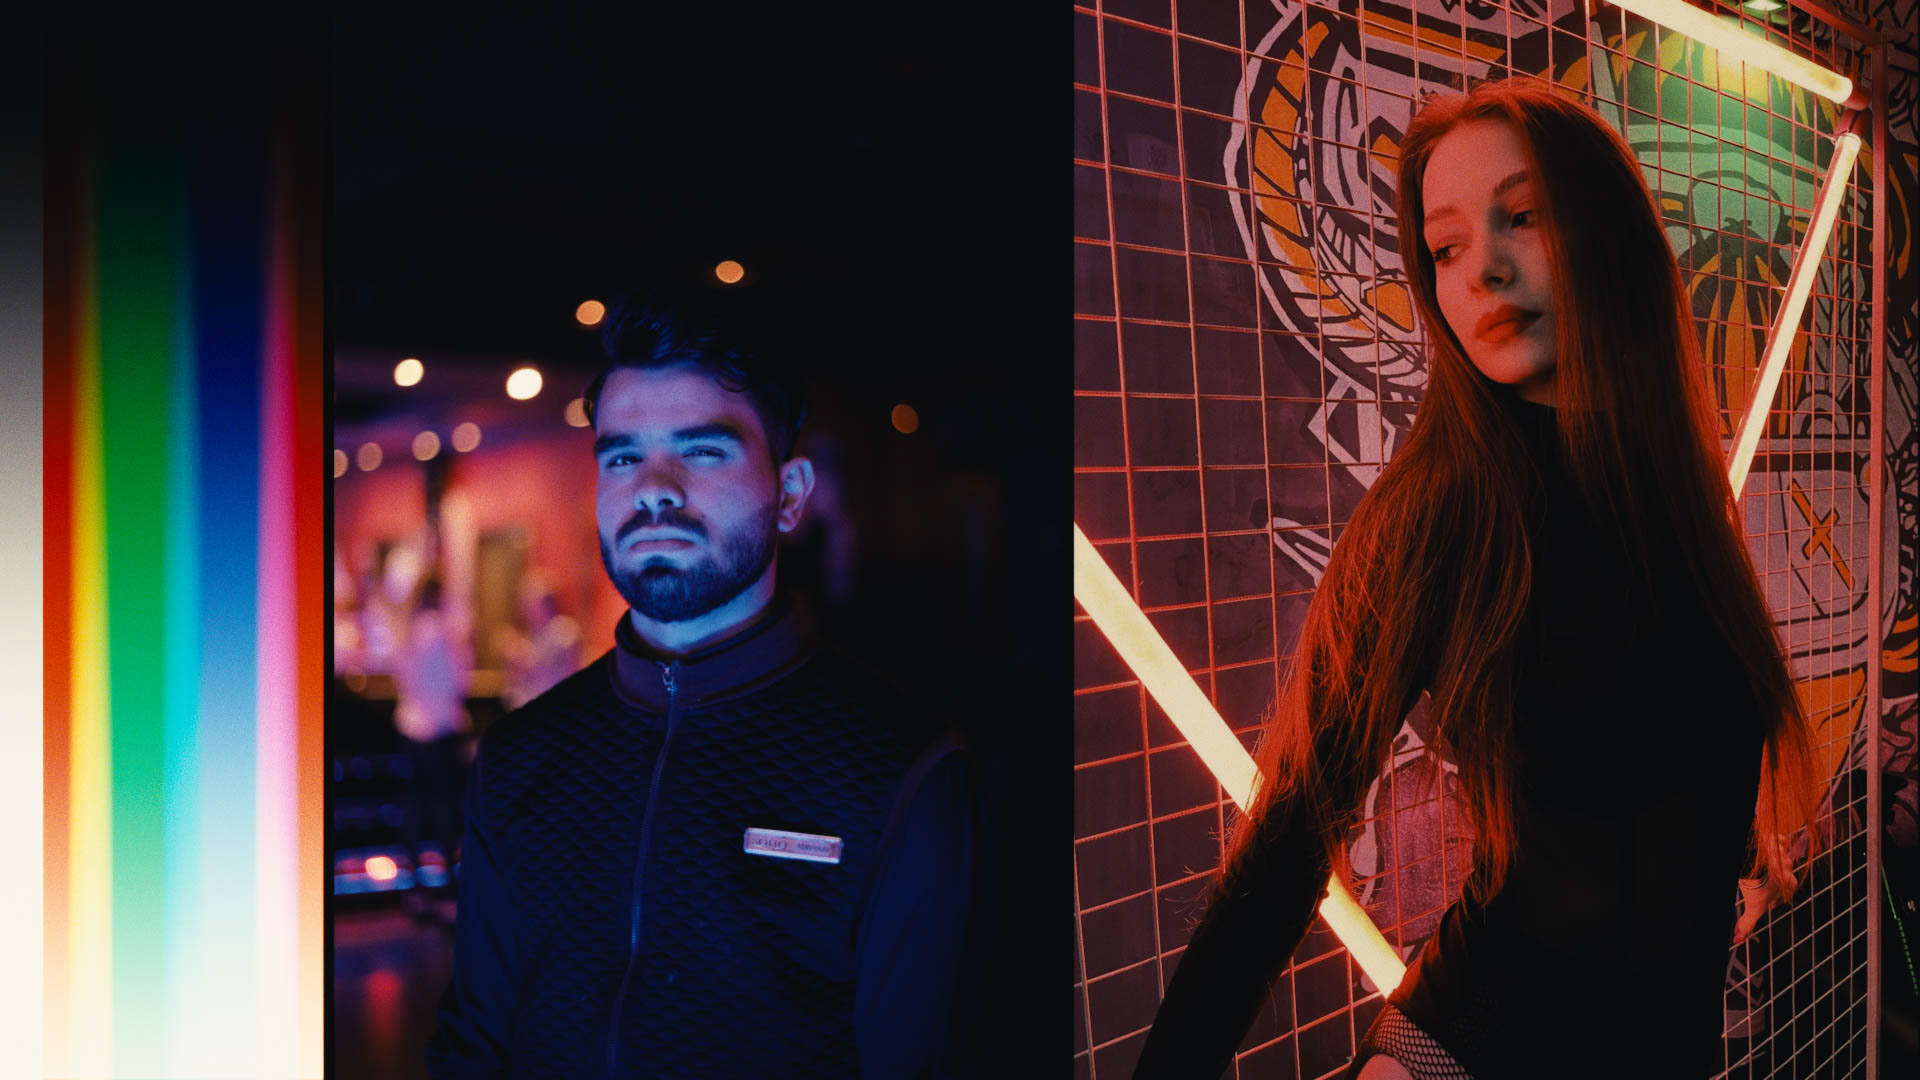
5219, paired with textural adjustments. Cineon vs 2383 Print from Resolve. Stills are from signatureedits. Photographers: Martin Masperoph et al. Charts are generated with Thatcher Freeman's RGB Chips and ColorChecker DCTLs.
Conclusion
Is this accurate?
Yes and no. In a way of perceiving an image that makes you believe it might be shot on film, it’s probably as accurate as it can get. In a mathematical way, not exactly. Every inversion is an approximation, and the amount of obtainable reference spectra is finite. While this is not 100% invertible, the more information you have, the better the approximation becomes. Having an unmapped input profile also improves it by a fair amount.
Remember, we are not inverting a baked LUT here. And that’s the sheer beauty of it. It’s stuff that shouldn’t work, but does. And it works remarkably well.
However, if you are seeking to make fully invertible transforms, to go from film response to your working space and back, that’s probably not the way to go. But is that a desirable goal anyway? At least for DcamProf’s integration method, the results are convincing with no more than a ColorChecker 24 as a reflective reference target. I would assume that you can reasonably increase the invertibility of your profiles by implementing more reflective and also emissive targets, which DcamProf lets you do. So, in theory, you might even get enough out of this method to make fully invertible transforms. I do not want to just stick my neck out and claim it without having tested it. But it’s plausible.


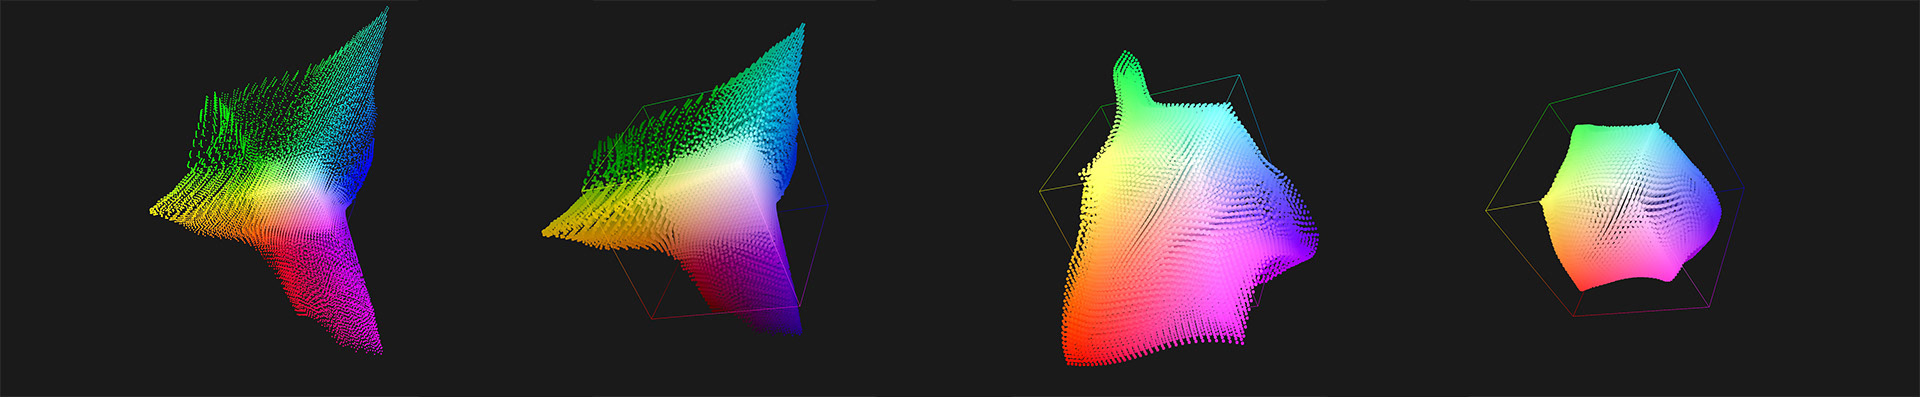
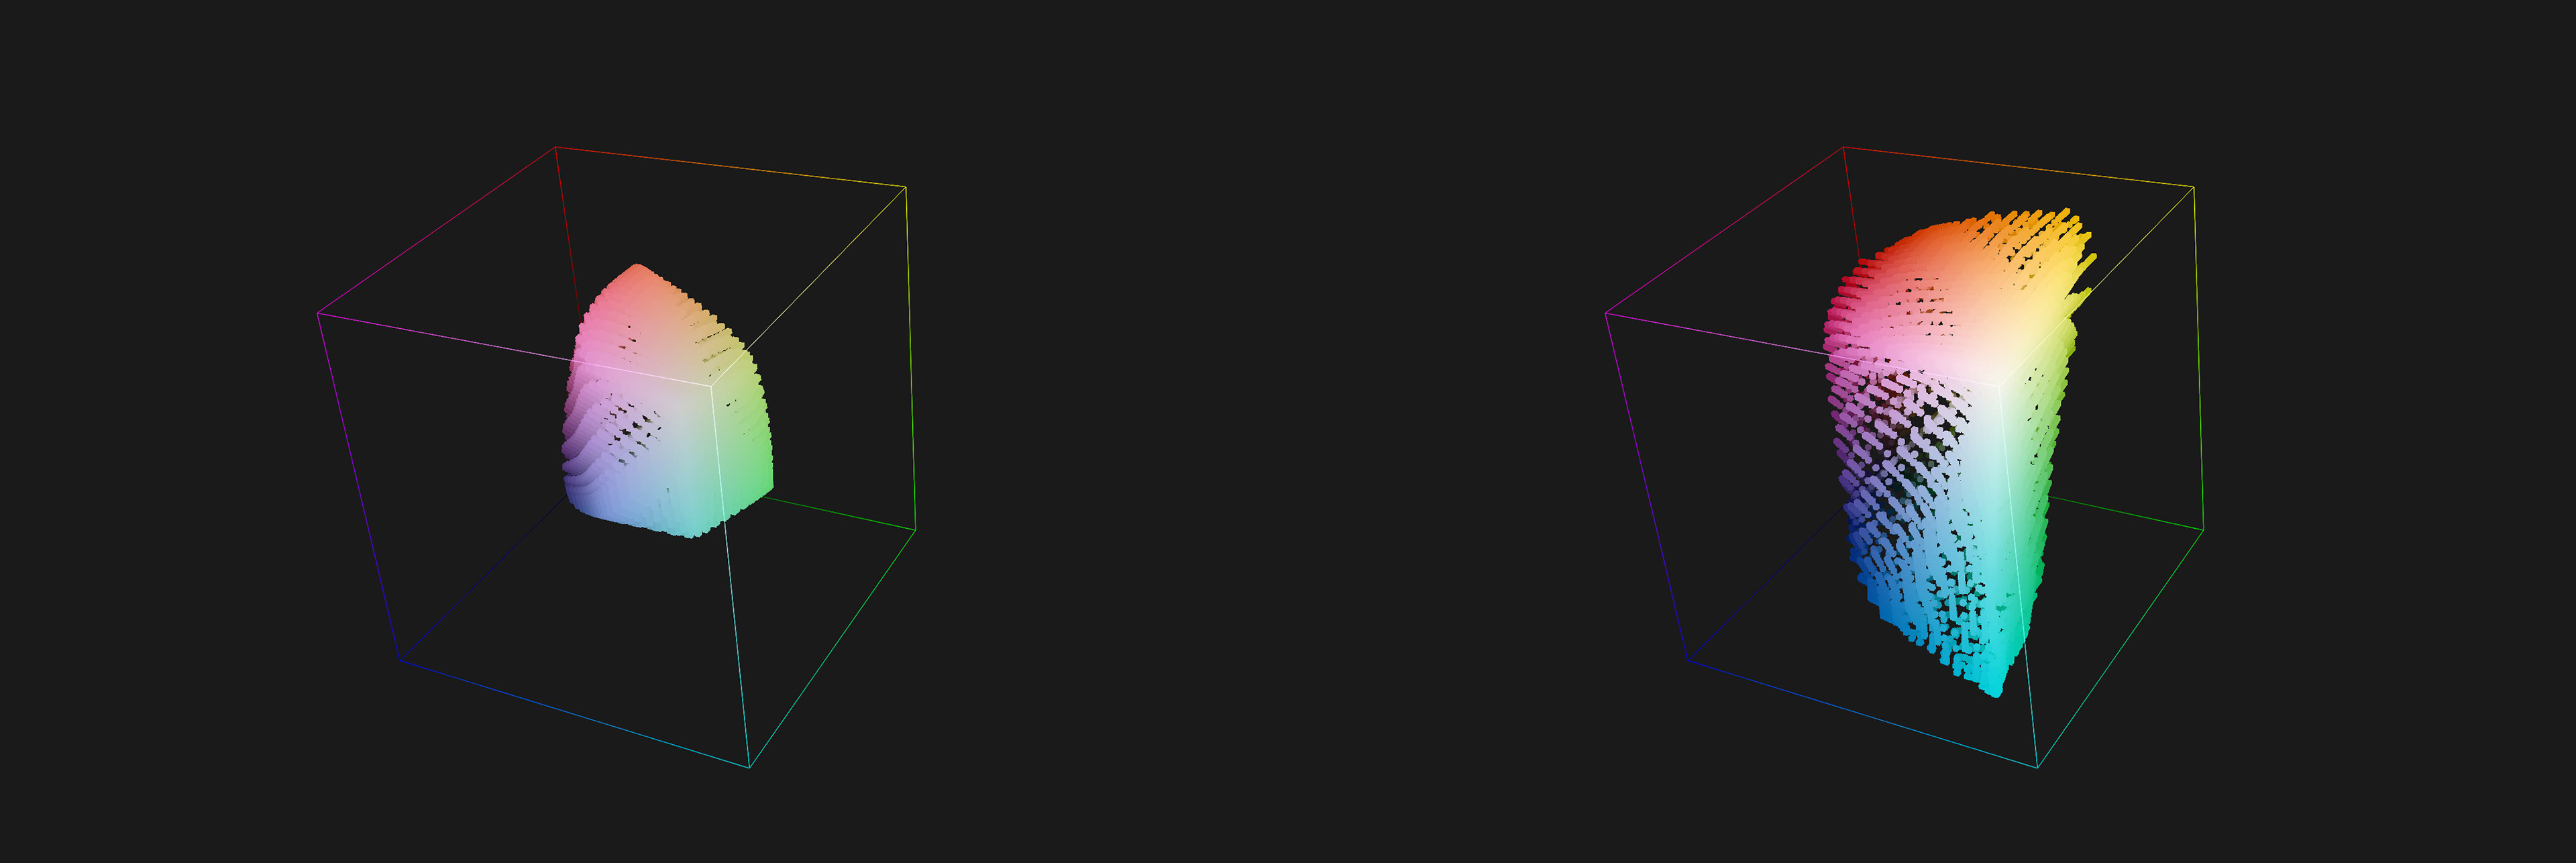
Charts are generated with Thatcher Freeman’s RGB Chips DCTL. Illustrations are in the following order: final emulation profile, raw input profile, raw input + inversion. The gradient typically goes haywire beyond a certain saturation value. Low saturation remains stable between 15 and 90% IRE, which is consistent with the CC24 reference.
Up- and downsides of this workflow
Upsides are obvious: no scripting or programming is needed. Everything is obtainable by a colourist with basic knowledge of colour science and a blissfully ignorant knowledge of the existence of JavaScript.
Downsides: not much, to be honest. If I had to hammer it down, I would say it’s still time-consuming to get it right. A lot of interpretation is needed and results may vary greatly. Also, from a craftsmanship perspective, ripping CLUT information out of ICC profiles may not be seen as particularly elegant. It’s up to you to decide.
With good references and a bit of perseverance, you can manufacture some pretty solid film emulation profiles that, in terms of image rendering, can easily hold up with leading solutions on the market, or even beat them.
The other thing is, as filmmakers, colourists or creators in general, it’s easy to fall into tunnel vision. We are so laser-focused on what is going on inside our respective crafts that we’re usually not even prone to consider who else might have been in the same boat all along, hoisting the sails while we were under deck counting provision rations. In this case, I’m talking about the incredible community of hobby photographers. Particularly hobby photographers with a passionate preference for landscape photography. What I’m trying to imply is: you have to thank Anders Torger for the heavy lifting here. He’s the genius. I’m just doing the manual labour.
Go out, shoot some landscapes. Explore DcamProf. Enjoy your limited time on this planet.
Until then: Good luck, and stay hydrated!
Florian
––––––––––––––––––––––––––––––––––
Revision History
17.03.2026 – stills added with final results
11.03.2026 – published
11.03.2026 – published